
I recently bought a Seagate Freeagent Go Dockstar, which is basically a SheevaPlug device with less RAM and Flash memory for a lot less money (~ $25). It comes with the same 1.2 GHz Feroceon 88FR131 CPU as the SheevaPlug. Unfortunately my Dockstar device arrived in dead condition.

When I first started the device its LED was flashing green for a few seconds (boot loader phase) and then began flashing amber. That is all that was happening. It did not aquire an IP address from my DHCP server nor was it reachable on its default IP address.
As I did not want to bring it back to the store where I bought it and because I intended not to use the pre-installed Pogoplug software anyway, I opened the device to check what was going on.
Opening the device revealed that there is a small connector on the PCB. Three of the pins are assigned to a serial port.
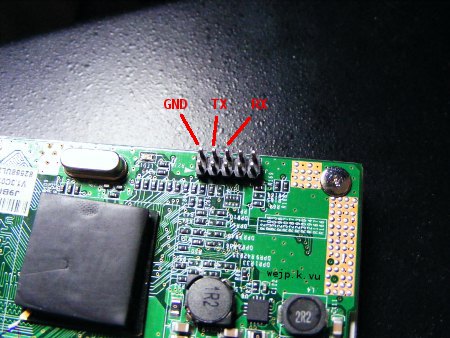
This serial port is basically a standard RS232 serial port with the exception that it uses only 3.3 V instead of the up to 12 V of a normal serial port found on desktop computers. It also comes without any handshaking lines, which is why there are only three pins (RX, TX, GND) neccessary for the serial port. Most serial ports on such embedded devices do not use 12 V, but either use 5 or 3.3 V where 3.3 V is becoming more and more common.
To connect such a device to a PC and its standard serial port, a level shifter (e.g. built around a MAX3232) is needed. While such a circuit is rather easy to build, there is an even simpler solution which has the advantage of also being usable on computers without a serial port.
All that is needed is a data cable used for certain older mobile phones. Lots older mobile phones have a serial port built-in instead of the now common USB device ports.
A suitable cable for this purpose is a DKU-5 data cable. I have used this one.
This cable comes with the very common PL2303 usb serial converter. In Linux it is being detected as:
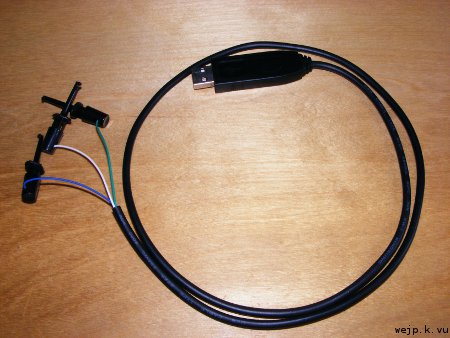
When using the serial cable mentioned above, the blue wire is the ground wire (GND), the green wire is the receive wire (RX) and the white wire is the send wire (TX). If you have got another serial cable and you got a multimeter you can easily find out which of the wires is connected to ground by measuring the resistance between each wire and the outer metal shield of the usb connector of the cable. Only the wire connected to ground will have a resistance close to zero ohms. You cannot as easily figure out which of the remaining wires is the RX wire and which is the TX wire, though. Either use the same cable as I did, so you already know the wiring or open the USB connector and have a look at the PCB inside.
Now that the serial cable is connected to the Dockstar, a program to communicate with the Dockstar over the serial connection is needed. On Linux minicom or screen can be used for that. This time I have used screen:
To fix that a working Linux kernel needs to be written to the flash. This can be done by telling U-Boot to first load a kernel over tftp and then tell U-Boot to write it to the NAND flash. To do that a tftp server on the local network is needed. On many Linux systems there is a package called tftp-hpa which contains such a tftp server.
The original Dockstar redstone kernel image can be found here. This needs to be placed in a location such that is accessible through the tftp server.
Once the tftp server is ready it is time to reboot the Dockstar.
When booting the Dockstar with the serial cable connected, after a short while U-Boot prints a message telling you to press a key to enter the u-boot console. Failing to do so will result in U-Boot trying to boot the broken kernel again.
First, the Dockstar needs an IP address:
Next the Dockstar needs to know the IP address of the TFTP server:
Now it is time to boot the kernel. Either execute
This should now successfully boot the system. If it now fails at a later point in the boot process you might need to also reflash the RAM disk image.
The Pogoplug image comes with ssh enabled by default but is being disabled as soon as the Dockstar is able to connect to the Internet. With a serial cable this is no problem as the access to the system over the serial port is still possible.
After repairing my Dockstar I immediately installed a U-Boot bootloader capable of booting from USB devices, as I did not intend to use the Pogoplug system.
This serial port is basically a standard RS232 serial port with the exception that it uses only 3.3 V instead of the up to 12 V of a normal serial port found on desktop computers. It also comes without any handshaking lines, which is why there are only three pins (RX, TX, GND) neccessary for the serial port. Most serial ports on such embedded devices do not use 12 V, but either use 5 or 3.3 V where 3.3 V is becoming more and more common.
To connect such a device to a PC and its standard serial port, a level shifter (e.g. built around a MAX3232) is needed. While such a circuit is rather easy to build, there is an even simpler solution which has the advantage of also being usable on computers without a serial port.
All that is needed is a data cable used for certain older mobile phones. Lots older mobile phones have a serial port built-in instead of the now common USB device ports.
A suitable cable for this purpose is a DKU-5 data cable. I have used this one.
This cable comes with the very common PL2303 usb serial converter. In Linux it is being detected as:
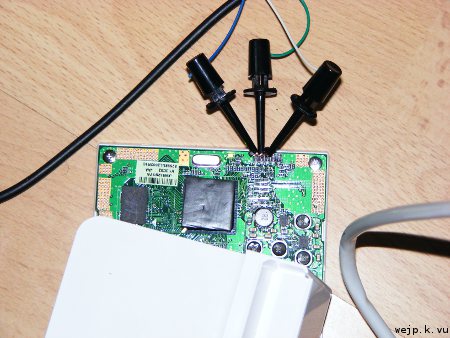
pl2303 4-5:1.0: pl2303 converter detected
usb 4-5: pl2303 converter now attached to ttyUSB0
usbcore: registered new interface driver pl2303
pl2303: Prolific PL2303 USB to serial adaptor driver
To build a universal serial cable that can easily be used on different devices I decided to use test hooks for the serial connection instead of a connector suitable only for the Dockstar's serial connector.
When using the serial cable mentioned above, the blue wire is the ground wire (GND), the green wire is the receive wire (RX) and the white wire is the send wire (TX). If you have got another serial cable and you got a multimeter you can easily find out which of the wires is connected to ground by measuring the resistance between each wire and the outer metal shield of the usb connector of the cable. Only the wire connected to ground will have a resistance close to zero ohms. You cannot as easily figure out which of the remaining wires is the RX wire and which is the TX wire, though. Either use the same cable as I did, so you already know the wiring or open the USB connector and have a look at the PCB inside.
Now that the serial cable is connected to the Dockstar, a program to communicate with the Dockstar over the serial connection is needed. On Linux minicom or screen can be used for that. This time I have used screen:
$ screen /dev/ttyUSB0 115200When powering on the Dockstar the U-Boot bootloader immediately writes some messages to the serial port which should appear in the screen session. This immediately revealed the reason why my Dockstar was unable to boot. The Linux kernel on the Dockstar's NAND flash had a checksum error preventing U-Boot from booting the kernel.
To fix that a working Linux kernel needs to be written to the flash. This can be done by telling U-Boot to first load a kernel over tftp and then tell U-Boot to write it to the NAND flash. To do that a tftp server on the local network is needed. On many Linux systems there is a package called tftp-hpa which contains such a tftp server.
The original Dockstar redstone kernel image can be found here. This needs to be placed in a location such that is accessible through the tftp server.
Once the tftp server is ready it is time to reboot the Dockstar.
When booting the Dockstar with the serial cable connected, after a short while U-Boot prints a message telling you to press a key to enter the u-boot console. Failing to do so will result in U-Boot trying to boot the broken kernel again.
First, the Dockstar needs an IP address:
setenv ipaddr 192.168.0.222Of course this IP address needs to be part of the subnet used for the local network and it must not be identical to the IP of another computer on the network.
Next the Dockstar needs to know the IP address of the TFTP server:
setenv serverip 192.168.0.3Now the kernel image can be fetched over the network:
tftp 0x800000 ce_kernel_redstone_v63.imgIt is important that the entire file is being transfered. Verify the file size. Now the kernel has been loaded into the Dockstar's RAM. We could boot the kernel from there, but we first want to write it to the NAND flash.
nand write.e 0x800000 0x100000 0x1e30f0This command tells U-Boot to write 1978608 bytes of data (0x1e30f0 bytes in hex - this is the size of the default Dockstar kernel) found at RAM address 0x800000 to the NAND location 0x100000.
Now it is time to boot the kernel. Either execute
bootm 0x800000to boot the kernel already loaded to RAM, or power-cycle the Dockstar.
This should now successfully boot the system. If it now fails at a later point in the boot process you might need to also reflash the RAM disk image.
The Pogoplug image comes with ssh enabled by default but is being disabled as soon as the Dockstar is able to connect to the Internet. With a serial cable this is no problem as the access to the system over the serial port is still possible.
After repairing my Dockstar I immediately installed a U-Boot bootloader capable of booting from USB devices, as I did not intend to use the Pogoplug system.